This article applies to the following CoolMaster products
- CoolMaster
- CoolMasterPro
- CoolMasterNet
- CloudBox
When the device is connected, the following screen is displayed. After a successful installation, all connected units are automatically detected, and the Main screen displays the detected Indoor units and their status.
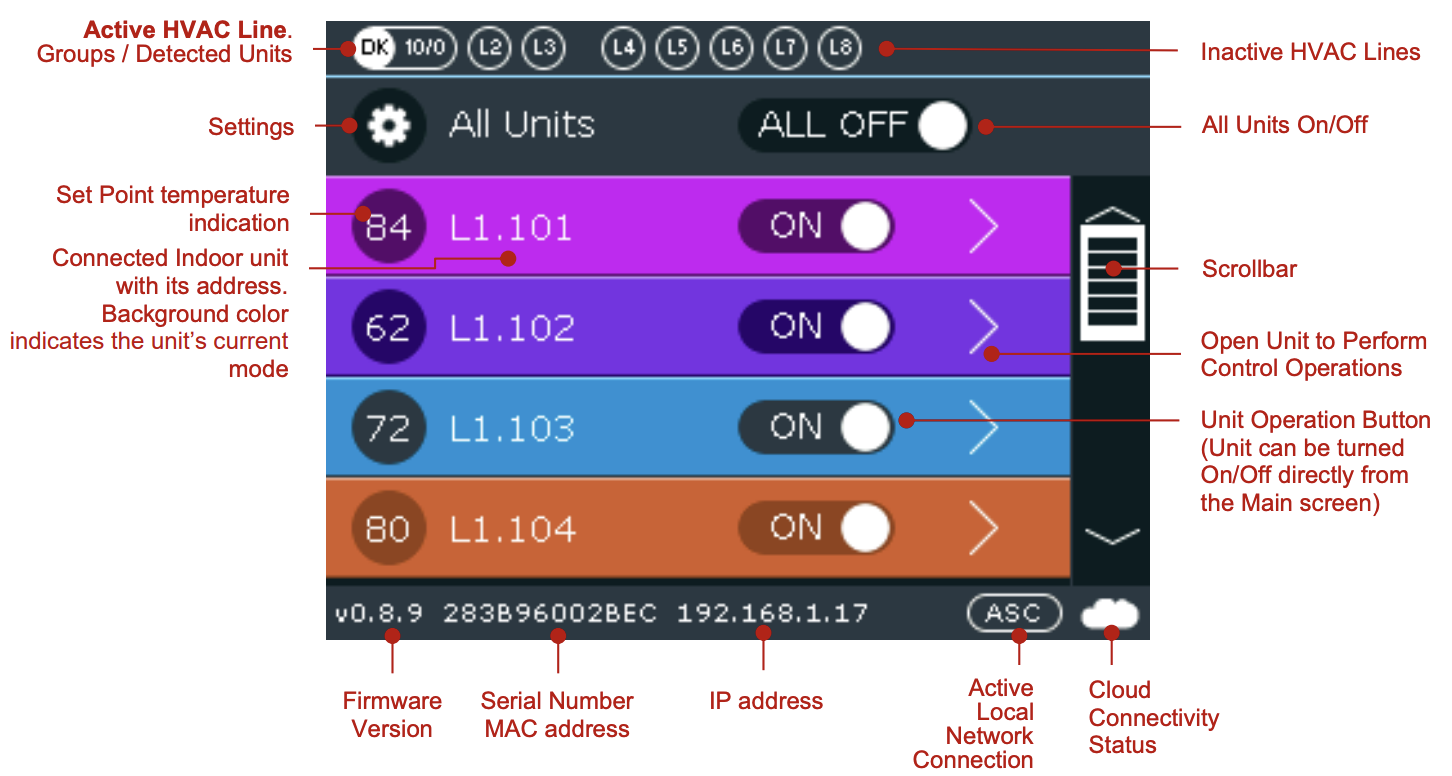
The top row of the above image is showing:
- The Active HVAC line on the left side of the screen (circle with white fill and black font). The active line’s manufacturer abbreviation is displayed inside the white circle (DK in the above picture). A list of the available manufacturers and respective abbreviations can be found here.
- Inactive lines on the just after the active line indicator
- . The number of detected Units. The number to the right of the manufacturer abbreviation, indicates the number of detected units. Daikin (DK) specific cases have two numbers: one represents groups and the second the number of detected units.
- Setting configuration. To change device settings, tap the Gear icon on the left and follow the instructions on the CoolMaster Settings chapter.
- HVAC line control, All HVAC lines can be turned On or Off by toggling the switch to the right of the Gear icon or individually by toggling the HVAC line’s switch. Use the Scrollbar on the right to scroll through available lines.
- Indoor unit's mode. The Indoor unit’s mode is reflected by the background color of its respective row:
- Violet - Unit in Fan mode
- Red - Unit in error state. The error code is indicated in a circle in the left.
- Blue - Unit in Cool mode
- Purple - Unit in Auto mode
- Green - Unit in Dry mode
- Light brown/orange - Unit in Heat mode
- Grey - Unit in Off mode
- When there is an error/malfunction in the VRF system, it is displayed on the CoolMaster. When an Indoor unit is in error, the Indoor unit’s row on the Main screen is displayed in red and the original HVAC vendor’s error code is displayed on the left side of the row (see image below). The user should contact the HVAC Technical Support indicating the displayed code.

- The lower part of the screen shows
- Firmware version
- Serial Number/MAC address
- IP Address - The IP Address can be either set automatically or manually. By default, DHCP is enabled. To change, tap the Settings button on the Main screen and select Network Settings. For automatic setting, simply turn On DHCP. To set manually, turn DHCP Off and select IP by tapping its button.
- Active Local network connection
Local Network Connection Description ASC ASCII Server MIP ModBus IP REST REST API SSDP Control4 protocol CAN BACnet IP HDL HDL Buspro over IP IZone Izone protocol - Cloud Connectivity Status. CoolMaster maintains permanent connection with the CoolRemote cloud server once TCP/IP networking with internet access is established. The CoolRemote connection status is displayed on the LCD screen as a cloud icon on the bottom right-hand corner of the screen.
Icon Description No Cloud icon Not TCP/IP networking 
Connecting - Communicating 
Connected - Idle 
Disconnected - Communication error code